Creating a website is an essential step in establishing your online presence, whether for personal use, business, or blogging. However, hosting and securing a website can seem challenging for beginners. This guide will walk you through the steps of hosting a website using platforms like Hostinger and securing it effectively.
Understanding Website Hosting
Website hosting is a service that allows individuals and organizations to make their websites accessible on the internet. Hosting providers, such as Hostinger, Bluehost, and GoDaddy, store your website’s files on servers and deliver them to users’ browsers when they visit your domain name.
Types of Web Hosting
Shared Hosting: Multiple websites share a single server’s resources, making it cost-effective but less performant for high-traffic websites.
VPS Hosting: Virtual Private Server (VPS) hosting provides dedicated resources within a shared environment, offering better performance and control than shared hosting.
Cloud Hosting: Websites are hosted across multiple servers, ensuring high availability and scalability.
Dedicated Hosting: You rent an entire physical server, giving you complete control and high performance, suitable for large-scale websites.
Managed WordPress Hosting: Optimized specifically for WordPress sites, providing automatic updates and better security features.
Step-by-Step Guide to Hosting a Website Using Hostinger
1. Choosing a Hosting Plan
Visit Hostinger’s official website and navigate to the hosting plans.
Select a plan based on your website’s requirements (e.g., shared hosting for beginners or VPS hosting for growing websites).
Consider features like storage, bandwidth, and SSL certificates while choosing a plan.
2. Registering a Domain Name
You can either register a domain with Hostinger or use an existing domain.
Choose a domain name that is memorable, relevant to your niche, and uses extensions like .com, .org, or .net.
3. Setting Up Hosting
After purchasing a hosting plan, log in to your Hostinger account.
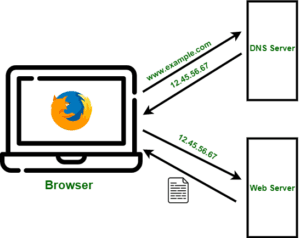
Navigate to the control panel (hPanel) and link your domain to the hosting account.
Update DNS records if you purchased the domain from another registrar.
4. Installing a CMS (Content Management System)
Most websites use a CMS like WordPress for easier content management.
Use the “Auto Installer” feature in Hostinger’s hPanel to install WordPress or other CMS platforms.
Configure the CMS settings, such as website title, admin username, and password.
5. Uploading Website Files
If you’ve developed your website locally, upload the files using the File Manager or an FTP client like FileZilla.
Place the files in the public_html directory for public access.
Testing Your Website
Visit your domain to ensure the website is live and functioning correctly.
Test for broken links, design inconsistencies, and navigation issues.
Securing Your Website
Website security is crucial to protect sensitive data, maintain user trust, and prevent cyberattacks. Here are steps to secure your website:
1. Use HTTPS and SSL Certificates
HTTPS encrypts data transmitted between the server and users.
Hostinger offers free SSL certificates with most hosting plans. Activate it from the hPanel.
2. Keep Software and Plugins Updated
Regularly update your CMS, themes, and plugins to patch vulnerabilities.
Use only trusted plugins and delete unused ones.
3. Implement Strong Passwords
Use complex passwords for admin accounts and database access.
Enable two-factor authentication (2FA) for an added layer of security.
4. Enable Web Application Firewall (WAF)
A WAF blocks malicious traffic and protects against common threats like SQL injection and cross-site scripting (XSS).
Hostinger provides an integrated WAF in its hosting plans.
5. Regular Backups
Schedule automatic backups of your website using Hostinger’s backup tool.
Store backups in a secure location, such as cloud storage or an external drive.
6. Monitor Website Activity
Use tools like Google Analytics or Jetpack to monitor traffic and detect unusual activity.
Hostinger’s hPanel also provides logs for server activity.
7. Install Security Plugins
WordPress users can enhance security with plugins like Wordfence, Sucuri, or iThemes Security.
8. Prevent DDoS Attacks
Use a Content Delivery Network (CDN) like Cloudflare to mitigate DDoS attacks.
Hostinger’s advanced plans often include DDoS protection.
9. Secure File Permissions
Set correct file permissions to restrict unauthorized access. For example:
Directories: 755
Files: 644
10. Scan for Malware
Perform regular malware scans using security tools like SiteLock or Hostinger’s built-in scanner.
Troubleshooting Common Issues
1. Website Not Loading
Check DNS settings and ensure the domain is correctly pointing to Hostinger’s servers.
Clear your browser cache or try accessing the site in incognito mode.
2. Slow Loading Speed
Optimize images and enable caching using plugins like WP Super Cache.
Use a CDN to reduce latency.
3. Login Issues
Reset your password using the “Forgot Password” option.
Ensure your account is not compromised by checking recent login activity.